Saturday, December 17, 2011

Peppermint Zebra Free Crochet Pattern!!

Nothing says Christmas like red and white peppermint candy canes!!  Here is a little Zebra who ate WAY too much peppermint candy and changed the color of his stripes!  Make yourself (or friend) a peppermint zebra for Christmas this year!  Hope you enjoy him!


Peppermint Zebra
Pattern created by Emily Lucero

Materials:
E hook
Yarn colors (Red Heart Super Saver)- cherry red, white, black
Stitch marker (safety pin works)
2 safety eyes (I used black 10 mm)
Stuffing

*This pattern is very color intensive.  In most pieces I carried my yarn (meaning that I did not cut off the previous color, I just worked over it until it was needed again).  A good understanding of the proper color changing method is important.  Also, it is not completely necessary to follow the stitch colors that I did.  You can vary a little and it will still come out looking great.
*The Peppermint Zebra that I made can easily be made into a traditional zebra by replacing the red yarn with black.

Head- red and white
Rnd 1: 6 sc in mc [red] (6)
Rnd 2: inc around [red, switching to white after last st] (12)
Rnd 3: sc around [white] (12)
Rnd 4: sc around [6 red, 6 white] (12)
Rnd 5: sc around [7 white, 5 red] (12)
Rnd 6: inc every other st [white] (18)
Rnd 7: inc every 3rd st [1 white, 11 red, 12 white] (24)
Rnd 8: sc around [10 white, 14 red] (24)
Rnd 9: sc around [white] (24)
Rnd 10: sc around [8 white, 9 red, 6 white, 1 red] (24)
Rnd 11: sc around [5 red, 19 white] (24)
Rnd 12: dec every 3rd st [5 white, 5 red, 5 white, 3 red] (18)
Rnd 13: dec every other st [white] (12)
Rnd 14: dec around [red] (6)
Finishing:  Place safety eyes between rounds 8 and 9, about 5 stitches apart.  Stuff firmly.  Weave end of yarn through each stitch of Round 14 and pull closed.  Fasten off, leaving a length of yarn for attaching head to neck.

Ears- white (make 2)
Row 1: ch 4
Row 2: dc in 3rd ch from hook and the next st.
Finishing:  weave in loose end and attach ears to head between rounds 10 and 11 of head, even with eyes.

Neck/Body- red and white
Rnd 1: ch 12, sl st to form a circle
Rnd 2: sc around [white] (12)
Rnd 3: sc around [6 red, 6 white] (12)
Rnd 4: sl st around [white] (12)
Rnd 5: inc every other st [9 white, 9 red] (18)
Rnd 6: inc every 3rd st [white] (24)
Rnd 7: inc every 4th st [15 red, 15 w] (30)
Rnd 8: sc around [15 white, 15 red] (30)
Rnd 9: sc around [white] (30)
Rnd 10: sc around [2 white, 16 red, 12 white] (30)
Rnd 11: sc around [21 white, 9 red] (30)
Rnd 12: sc around [7 red, 23 white] (30)
Rnd 13: dec every 4th st [white] (24)
Rnd 14: dec every 3rd st [4 white, 10 red, 4 white] (18)
Rnd 15: dec every other st [7 white, 5 red] (12)
Rnd 16: dec around [white] (6)
Finishing:  Stuff firmly.  Weave end of yarn through each stitch of Round 16 and pull closed.  Fasten off, and weave in remaining yarn.

Mane- red, white and black
Cut 19 2 ½ inch yarns.  Switch off evenly to make sure the color is spread throughout mane.  Fold pieces in half one by one, inserting hook into stitches of head and neck and pulling piece of yarn through.  Pull ends through loop and pull to knot.

Forelegs (arms)- red and white (make 2)
Rnd 1: 6 sc in mc [red] (6)
Rnd 2: inc around [red] (12)
Rnd 3: sc around [red] (12)
Rnd 4: dec every other st [white] (8)
Rnd 5: sc around [1 white, 4 red, 3 white (8)
Rnd 6: sc around [6 white, 2 red] (8)
Rnd 7: sc around [5 red, 3 white] (8)
Finishing:  sl st to finish.  Stuff firmly and attach to body.

Legs- red and white (make 2)
Rnd 1: 6 sc in mc [red] (6)
Rnd 2: inc around [red] (12)
Rnd 3: sc around [red] (12)
Rnd 4: dec every other st [white] (8)
Rnd 5: sc around [1 white, 4 red, 3 white (8)
Rnd 6: sc around [6 white, 2 red] (8)
Rnd 7: sc around [5 red, 3 white] (8)
Rnd 8: sc around [6 white, 2 red] (8)
Rnd 9: sc around [5 red, 3 white] (8)
Rnd 10 sc around [white] (8)
Finishing:  sl st to finish.  Stuff firmly and attach to body.  I stitch legs together at tips to hold them in place.

Tail- red, white, and black
Cut 7 inch strands (1 black, 1 red, 1 white).  Fold in half and knot.  Braid for about an inch, then knot.  Cut off, leaving a frill.

Please feel free to post any questions or comments you may have!  Enjoy!!


Wednesday, November 30, 2011

Perry the Platypus Free Crochet Pattern!!

Okay, here he is!!  I've had a couple of requests for an amigurumi Perry the Platypus from Phineas and Ferb...  You've got to love the blank stare of domesticated Perry, which serves as an adorable cover for his real persona... Agent P!  I hope you enjoy having a pet platypus of your very own!


Perry the Platypus
Pattern created by Emily Lucero

Materials
G hook
Yarn colors (Red Heart Super Saver)- turqua, orange, dark brown, white
2 brown safety eyes (12 mm)
Stitch marker (I used a safety pin)
Stuffing


Body- turqua
Rnd 1: 8 sc in mc (8)
Rnd 2: inc every sc (16)
Rnd 3: inc every other sc (24)
Rnd 4: inc every 3rd sc (32)
Rnd 5-19: sc around (32)
Rnd 20: dec every 3rd sc (24)
Rnd 21: dec every other sc (16)
Rnd 22: dec every sc (8)
Finishing: Stuff body completely.  Weave end of yarn through each sc of round 22 and pull tight to close.  Tie off and weave remaining yarn into the body.

Eyes- white (make two)
6 sc in mc, slip st to connect to first sc. 
Finishing: Break yarn, leaving a length for attaching to body.  Push stem of safety eye through the center whole of the ring just created.  Attach the back to the other side, securing the safety eye to the white part.  This will create a white rim around the brown eye.  Attach to body between 6th and 7th round, about 5 stitches apart.

Beak- orange
Rnd 1: sc 4 in mc (4)
Rnd 2: inc around (8)
Rnd 3: inc every other sc (12)
Rnd 4: inc every 3rd sc (16)
Rnd 5: inc every 4th sc (20)
Rnd 6: dec every 4th sc (16)
Finishing: break yarn, leaving a length for attaching to body.  Attach to face one round below the eyes.  Do not stuff.

Hand- turqua (make two)
Rnd 1: 6 sc in mc
Rnd 2: sl st in first sc, 2 ch picot, sl st in next sc, 2 ch picot, sl st in next sc, 2 ch picot, sl st in next two sc, sc, ch 6, sc in 2nd ch from hook, sc 4 down remainder of ch, sl st to connect to original circle.
Finishing: break yarn, leaving a length for attaching to body.  Weave yarn through wrist and up arm.  Attach to body at same round as beak.

Feet- orange (make two)
Rnd 1: 6 sc in mc (6)
Rnd 2: inc around (12)
Rnd 3: sl st in first sc, 2 ch picot, sl st in next sc, 2 ch picot, sl st in next sc, 2 ch picot, sl st to finish. 
Finishing: break yarn, leaving a length of yarn for attaching to body.  Attach to bottom of body with toes poking out.

Tail- orange
Rnd 1: 6 sc in mc (6)
Rnd 2: inc around (12)
Rnd 3: inc every other sc (18)
Rnd 4: inc every 3rd sc (24)
Rnd 5-6: sc around (24)
Rnd 7: dec every 3rd sc (18)
Rnd 8: dec every other sc (12)
Rnd 9-13: sc around (12)
Finishing: break yarn, leaving a length to attach to body.  Do not stuff.  Attach to body in back so tail sits evenly on the ground.

Hat- dark brown
Rnd 1: 6 sc in mc (6)
Rnd 2: inc around (12)
Rnd 3: inc every other sc (18)
Rnd 4: sc around in back loop only (18)
Rnd 5-6: sc around (18)
Rnd 7: inc around (36)
Rnd 8: inc every other sc (54)
Finishing: break yarn and weave in remaining.  Since the hat is where his persona lies (without it he is the mindless, unfocused, domesticated pet and with it he is Agent P), I left the hat unattached, that way he could be either character at anytime.  You can decide whether or not to attach the hat permanently.

Enjoy!!  Please feel free to post any questions or comments!!  Pictures are much enjoyed. :)


Sunday, November 13, 2011

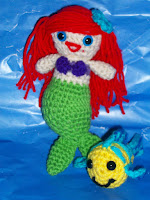
Little Mermaid and Flounder Free Crochet Patterns!!

The Little Mermaid has long been one of my all-time favorite Disney movies!  Ariel is brave and adventurous and I love how she collects gadgets and gizmos.  And hey, you gotta love her best friend Flounder.  He is always by her side, no matter what trouble she is going to get into, even if he is a little weary of sharks.  Now you can have your own Ariel and Flounder dolls and see what mischief you guys can get into together! Enjoy!!


Ariel the Little Mermaid
Pattern created by Emily Lucero

Materials:
F Hook
Yarn colors (Red Heart Super Saver)- Cherry red, cream, light green, and a little of dark purple, light purple and turqua
Two safety eyes (I used blue 12 mm)
Stitch marker (safety pin works)
Stuffing

Head and Body- start with red, switch to cream, light purple, cream and finish in light green
With red, chain 2
Rnd 1: 6 sc in mc (6)
Rnd 2: inc around (12)
Rnd 3: inc every other st (18) 
Rnd 4: inc every 3rd st (24)
Rnd 5: (Sc in next 7 sts, inc) around (27)
Rnd 6: Sc around, changing to cream in last 2 loops of last st (27)
Rnd 7: Working in back loops only. Sc around (27)
Rnd 8: (Sc in next 8 sts, inc) around (30)
Rnd 9: (Sc in next 8 sts, dec) around (27)
Rnd 10: (Sc in next 7 sts, dec) around (24)
Rnd 11: (Sc in next 2 sts, dec) around (18)
Rnd 12: dec every other st (12)
Rnd 13: sl st around (12)
Rnd 14: inc every other around, changing to light purple in last 2 loops of last st (18)
Rnd 15: Sc around (18)
Rnd 16: Sc around, changing to cream in last 2 loops of last st (18) 
Rnd 17: Sc in next 4 sts, dec, sc in next 7 sts, dec, sc in next 3 sts (16)
Rnd 18: Sc around, changing to light green in last 2 loops of last st (16)
Rnd 19: Sc in next 4 sts, inc, sc in next 7 sts, inc, sc in next 3 sts (18)
Rnd 20: inc every 3rd st (24)
Rnd 21-24: sl st in next 4 sts, sc in next 2 sts, hdc in next 13 sts, sc in next 2 sts, sl st in next 9 st (24)
Rnd 25: dec every 4th st around until the last four sts, sc in last 4 sts (20)
Rnd 26: dec every 3rd st (15) 
(Stuff Ariel at this point)
Rnd 27: dec every other st (10)
Rnd 28-29: sc around (10)
Finishing: Break yarn and weave in end.

Tail Fins- light green (make 2)
Rnd 1: 4 sc in mc (4)
Rnd 2: inc every other st (6)
Rnd 3: inc every third st (8)
Rnd 4: inc every 4th st (10)
Rnd 5: sc around (10)
Rnd 6: sc around (10)
Rnd 7: dec every 4th st (8)
Rnd 8: dec every 3rd st (6)
Rnd 9: dec every other st (4)
Finishing: slip stitch to bind off, then weave yarn through round 9 and pull tight to close.  Leave a length of yarn to attach tail fin to body.  (Do not stuff)

Arms- cream (make 2)
Rnd 1: 6 sc in mc (6)
Rnd 2-6: sc around (6)
Finishing: slip stitch to bind off yarn.  Stuff and sew arms to body just under the head and above the bikini top.

Shell bikini top- dark purple (make 2)
Each shell is made up of a cluster of sc
Ch 2, 4sc in second ch from hook.
Finishing: slip stitch to bind off yarn, weave in stray yarn and attach to bikini top.

Hair- cherry red
Cut 34 pieces of red yarn, 5 inches long. Hold two strands of yarn, fold in half. With top of the head facing, insert hook toward outer of head in free loops on rnd 6, draw the folded end through the stitch and pull the loose ends through the folded end, draw the knot up tightly. Add fringe from one side of head to the back of head and from here to the other side of head.
For the bangs, repeat the process above for three stitches (each holding two pieces of yarn).  This will make the hair reach farther to her face on one side.  Grab the dangling bang hairs and bring across forehead, binding to the other side of her head.  This will make Ariel’s bangs reach across from one side of her face to the other.

Flower- turqua
Rnd 1: 6 sc in mc (6)
Rnd 2: (sl st, sc, sl st) in each st around (18)
Finishing: slip stitch to bind of yarn.  Connect flower to hair at the base of the bangs.

Finishing: Assemble all pieces, then embroider a red mouth on her face.

Thanks to K and J Dolls for sharing their free mermaid pattern from which I borrowed a few things and was inspired by for the rest! http://kandjdolls.blogspot.com/2010/11/little-mermaid-free-amigurumi-crochet.html


Flounder
Pattern created by Emily Lucero

Materials
F hook
Yarn colors (Red Heart Super Saver)- bright yellow, turqua, blue
Stitch marker (safety pins works)
Two safety eyes (I used black 10 mm)

Body- yellow
Rnd 1: 6 sc in mc (6)
Rnd 2: Inc twice, sc, Inc twice, sc (10)
Rnd 3: Inc three times, sc twice, Inc 3 times, sc twice (16)
Rnd 4: sc two times, Inc 4 times, sc 4 times, Inc 4 times, sc two times (24)
Rnd 5-6: sc around (24)
Rnd 7: dec every 5th (20)
Rnd 8: dec 2 times, sc 4 times, dec 3 times, sc 4 times, dec (14)
Insert safety eyes between 2nd and 3rd rounds, two stitches apart with the pinched fin-like side at the top.
Rnd 9: dec, sc 5 times, dec, sc 5 times (12)
Rnd 10: dec, sc 4 times, dec, 4 sc (10)
Rnd 11: dec, sc 3 times, dec, sc 3 times (8)
Rnd 12: dec, sc 2 times, dec, sc 2 times (6)

(Work on the body stops here for a minute, while we crochet the fin on the top of the body)
Using turqua, connect yarn with a loop near tail
Row 1: sc 8 along top of fish, ch 1, turn
Row 2: sc 2 LB, sc 2 DB, sc 2 LB, sc 2 DB,ch 1, turn
Row 3: sc 6 (2DB, 2 LB, 2DB), dec (LB)
(Now continue working on the body with yellow where you left off)

Rnd 13: sc around (6)
Finishing: Break yarn and stuff Flounder tightly
 
Tail- turqua
Row 1: ch 4, ch 1, turn
Row 2: Inc, sc 3 times, ch 1, turn
Row 3: sc 3 times, Inc, ch 2, turn
Row 4: 2 hdc in next stitch, sc 4 times, sl st to finish
Embroider dark blue stripes to accent the tail
Leave long piece of yarn to attach to Flounder's backside.
Embroider details-
Using long piece of turqua, embroider four “lines” on each side of Flounder’s body, extending from the top fin downward.  Each “line” is made of three lines of turqua, two being the same length and the back one being half as long as the other two.

Side fins- start with turqua
Row 1: ch 4, ch 1, turn (change to blue)
Row 2: sc 3 times, Inc, ch 1, turn (change to turqua)
Row 3: dec, sc 3 times, sl st to finish.
Attach fins to Flounder!

 I hope you enjoy these patterns!  Feel free to comment or leave any questions.  Pictures of your own work are much appreciated!


Sunday, October 2, 2011

Smurfette Free Crochet Pattern!!


The Smurf collection is never complete without Smurfette, so here she is!!  I had a lot of fun designing her and I hope you all enjoy her too!  Fyi, she is one biker babe and she can stand on her own! :) 


 Smurfette

Pattern created by Emily Lucero

Materials:
G hook
Yarn colors (Red Heart Super Saver)- turqua, white, yellow, small amount of black
Stitch marker (safety pin works)
2 safety eyes (I used blue)


Head (turqua)
Rnd 1: 6 sc in mc (6)
Rnd 2: inc around (12)
Rnd 3: sc, inc in next 2 st, sc in next 3 st, inc in next 2 st, sc in next 4 st (16)
Rnd 4: (inc every third st) 5 times, sc in last stitch (21)
Rnd 5: sc in next 2 st, inc in next 3 st, sc in next 7 st, inc in next 3 st, sc in next 6 st (27)
Rnd 6-7: sc around (27)
Rnd 8: sc in next 2 st, dec 3 times, sc in next 7 st, dec 3 times, sc in next 6 st (21)
Rnd 9: (sc in next 2 st, dec) 5 times, sc in last stitch (16)
Rnd 10: sc, dec 2 times, sc in next 3 st, dec 2 times, sc in next 4 st (12)
Rnd 11: dec around (6)
Finishing: Place eyes between the 4th and 5th rows, with two stitches between.  Stuff head firmly.  Weave end of yarn through each stitch of Round 11 and pull closed.  Fasten off, leaving a length of yarn for attaching head to body.

Nose (turqua)
Rnd 1: 3 sc in mc (3)
Rnd 2: inc around (6)
Rnd 3: dec around (3)
Rnd 4: sc in next 2 st, finish off.
Finishing: Only 2 of the 4 stitches of round 4 have sc made in them.  This makes the nose a bit uneven.  Attach the nose to the face, just below the eyes with the two stitches of round 4 on the bottom.  This forces the nose to point slightly upward.  Weave in the extra yarn.

Hair (yellow)
Loop yellow yarn around and around (length isn’t important, just make sure the hair is longer than necessary, then trim later.  In the end the hair should reach down to the bottom of her dress).  Tie the top part of the loop together using a stray piece of yellow yarn.  Cut the bottom of the loop so that you are left with a bunch of hair strands free at the bottom yet connected at the top.  Do this three individual times, creating 3 clusters of hair.  Attach the hair to Smurfette’s head.  I attached the 3 clusters strategically: two facing back and the third to act as her bangs so coming across her head just above the forehead.  For the bang cluster, gather them up so they push out a little bit, then pin to her head where her ear would be.  I tied the hair back slightly from her face to avoid her hair covering her face. 

Hat (white)
Rnd 1: Ch 33, sl st in 1st ch to form ring
Rnd 2: sc around (32)
Rnd 3: (sc in 6 st, dec) 4 times (28)
Rnd 4: (sc in 2 st, dec) 7 times (21)
Rnd 5: (dec every other) 7 times (14)
Rnd 6: sc in next 6 st, ch 1, turn (6)
Rnd 7: sc 15 st around (stitching back across the 6 st from last rnd, and dropping to the remaining stitches from row 6), sl st in last stitch of rnd 7 (15)
Rnd 8: sc in next st, (dec every other) 4 times, sc in next 2 st (11)
Rnd 9: sc around (11)
Rnd 10: sc, dec, sc in next 4 st, dec, sc in next 2 st (9)
Rnd 11-15: sc around (9)
Rnd 16: sc, dec 4 times (5)
Finishing: Weave end of yarn through each stitch of Round 17 and pull closed.  Stuff tip of hat lightly, fold over in front and attach to round 6 of hat.  Stuff the rest of hat lightly before attaching to head.  Attach to head, on top of hair.  Make sure that Smurfette’s hair is spread out evenly under the hat before attaching.

Body (Body, legs and feet done as one piece) (Turqua)
Rnd 1: 6 sc in mc (6)
Rnd 2: sc around (6)
Rnd 3: inc around (12)
Rnd 4: inc every other (18)
Rnd 5: sc around (18)
Rnd 6: inc every 3rd st (24)
Rnd 7: sc around (24)
Rnd 8: inc every 4th st (30)
Rnd 9: sc around (30)
Rnd 10: dec every 4th st (24)
Rnd 11: dec every 3rd st (18)- Do not break yarn.  First leg will be crocheted directly on this rnd.  Second leg will be connected later

Leg #1 (continuing with turqua, then white later)
Rnd 1: sk 8 sc of rnd 11 of body, sl st in 9th st, ch 1, turn
Rnd 2: sc 9 (9)
Rnd 3-sc around, inc in last st (11)
Rnd 4: sc around leg (11)
Rnd 5: (sc, dec) 3 times, sc in last 2 sc (8)
Rnd 6: sc, inc in next 3 st, sl st in next 4 st (11)
Rnd 7: sl st in next 2 st, inc in next 4 st, sl st in next 5 st (15), Switch to white 
Rnd 8: sl st in next 5 st, inc in next 5 st, sl st in next 5 st (20)
Rnd 9: In front loop only, dec around (10)
Rnd 10: tr in next st, sl st in next st
Finishing: Pull triple stich out so it pokes out like her high heel.  Stuff body, leg and foot completely.  Whip stitch foot closed from one side to the other.  This will make the foot longer rather than wider to match the general shape of a smurf foot.  Finish off and weave extra yarn into leg.

Leg #2 (with turqua, then white later)
Rnd 1: connect yarn to middle front of body with loop.  Ch 1, sc 9 around
Rnd 2: sl st in st of other leg, ch 1,
Rnd 3: sc around next 11 st (11)
Rnd 4: sk 1 st, sc around (11)
Rnd 5-10: same as rnds 5-10 of Leg #1
Finishing: Pull triple stich out so it pokes out like her high heel.  Stuff body, leg and foot completely.  Whip stitch foot closed from one side to the other.  This will make the foot longer rather than wider to match the general shape of a smurf foot.  Finish off and weave extra yarn into leg.  Attach Smurfette’s head to her body.

Body Adjustment: 
~With a stray piece of turqua yarn, connect to the side middle of Smurfette’s belly.  Take yarn through her body and pull, thinning out her body slightly, kind of like a girdle… oh the joys of being a girl. ;) This will help her look more feminine and help the dress fit a bit better.
~With black yarn, sew on a mouth

Hand (turqua)- make 2
Rnd 1: ch 8, sl st in 1st ch to make loop
Rnd 2: sc around (8)
Rnd 3: (sc in next 2 st, dec) 2 times (6)
Rnd 4-7: sc around (6)
Rnd 8: inc around (12)
Rnd 9: sl st, tr st, sl st, sc in next 9 st (12)
Rnd 10: (dec every other) 4 times (8)
Rnd 11: dec around (4)
Finishing: whip stitch fingertip end closed.  Pull yarn through to outside of palm, thread yarn through hand, pulling to make her hand cup slightly, tie off then continue weaving yarn down the wrist until it comes out through the bottom.  Do not stuff.  Use remaining yarn to attach arm to body in desired position.

Dress (white)
Rnd 1: chain 26, sl st in 1st ch to form a ring
Rnd 2: sc in next 6 st, ch 6, sk next 6 st, sc in 7th st, sc in next 5 st, ch 6, sk 6 st, sc in last st (25)
Rnd 3: sc around (25) (Fit dress onto body with arms poking out the two arm holes.  Finish dress while Smurfette is wearing dress)
Rnd 4-7: sc around (25)
Rnd 8: inc around (50)
Rnd 9: inc in next two stitches (move safety pin here) (sl st, sc, hdc, dc, tr, dc, hdc, sc, sl st) 6x, making the waves on her dress.
Finishing:  Weave extra yarn into last round of dress.  

Please feel free to ask any questions (in some places it was difficult to describe what I did) or leave any comments. :)  Enjoy!!

Friday, September 16, 2011

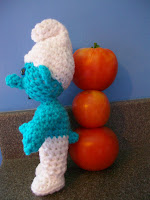
Smurf Free Crochet Pattern!!

Last week I went and saw the new Smurf movie.  So cute!!  As I was watching the movie my brain was already calculating how I would design a crochet pattern of my own cute little Smurf.  This is what I came up with.  Hope you enjoy it!!  My niece has requested Smurfette so I hope she will be joining Clumsy soon!


Smurf (boy)
Pattern created by Emily Lucero

Materials:
G hook
Yarn colors (Red Heart Super Saver)- turqua, white, small amount of black
Stitch marker (safety pin works)

Head (turqua)
Rnd 1: 6 sc in mc (6)
Rnd 2: inc around (12)
Rnd 3: sc, inc in next 2 st, sc in next 3 st, inc in next 2 st, sc in next 4 st (16)
Rnd 4: (inc every third st) 5 times, sc in last stitch (21)
Rnd 5: sc in next 2 st, inc in next 3 st, sc in next 7 st, inc in next 3 st, sc in next 6 st (27)
Rnd 6-7: sc around (27)
Rnd 8: sc in next 2 st, dec 3 times, sc in next 7 st, dec 3 times, sc in next 6 st (21)
Rnd 9: (sc in next 2 st, dec) 5 times, sc in last stitch (16)
Rnd 10: sc, dec 2 times, sc in next 3 st, dec 2 times, sc in next 4 st (12)
Rnd 11: dec around (6)
Finishing: Place eyes between the 4th and 5th rows, with two stitches between.  Stuff head firmly.  Weave end of yarn through each stitch of Round 11 and pull closed.  Fasten off, leaving a length of yarn for attaching head to body.

Nose (turqua)
Rnd 1: 4 sc in mc (4)
Rnd 2: inc around (8)
Rnd 3: dec around (4)
Rnd 4: sc around (4)
Finishing: finish off (Don’t stuff)

Ears (turqua)- make 2
Rnd 1: 4 sc in mc, ch 1 (4)
Rnd 2: turn, sc in next 4 st, sl st in same stitch to finish.
Connect ear with the highest point between 5th and 6th rows

Hat (white)
Rnd 1: Ch 33, sl st in 1st ch to form ring
Rnd 2-3: sc around (32)
Rnd 4: (sc in 6 st, dec) 4 times (28)
Rnd 5: (sc in 2 st, dec) 7 times (21)
Rnd 6: (dec every other) 7 times (14)
Rnd 7: sc in next 6 st, ch 1, turn (6)
Rnd 8: sc 15 st around (stitching back across the 6 st from last rnd, and dropping to the remaining stitches from row 6), sl st in last stitch of rnd 7 (15)
Rnd 9: sc in next st, (dec every other) 4 times, sc in next 2 st (11)
Rnd 10: sc around (11)
Rnd 11: sc, dec, sc in next 4 st, dec, sc in next 2 st (9)
Rnd 12-16: sc around (9)
Rnd 17: sc, dec 4 times
Finishing: Weave end of yarn through each stitch of Round 17 and pull closed.  Stuff tip of hat lightly, fold over in front and attach to rnd 6.  Stuff the rest of hat lightly before attaching to head.  Tuck rnd 1 under slightly and sew hat to head (the tucked part should connect to head just above eyebrows to make hat poke out a bit from the forehead.  Rnd 1 of back part of hat can be connected directly to head without tucking).

Body (Body, legs and feet done as one piece) (Turqua, then white later)
Rnd 1: 6 sc in mc (6)
Rnd 2: sc around (6)
Rnd 3: inc around (12)
Rnd 4: inc every other (18)
Rnd 5: sc around (18)
Rnd 6: inc every 3rd st (24)
Rnd 7: sc around (24)
Rnd 8: inc every 4th st (30)- switch to white
Rnd 9: sc around (30)
Rnd 10: dec every 4th st (24)
Rnd 11: dec every 3rd st (18)- Do not break yarn.  First leg will be crocheted directly on this rnd.  Second leg will be connected later

Leg #1 (continuing with white)
Rnd 1: sk 8 sc of rnd 11 of body, sl st in 9th st, ch 1, turn
Rnd 2: sc 9 (9)
Rnd 3-4: sc around leg (11)
Rnd 5: (sc, dec) 3 times, sc in last 2 sc (8)
Rnd 6: sc, inc in next 3 st, sl st in next 4 st (11)
Rnd 7: sl st in next 2 st, inc in next 4 st, sl st in next 5 st (15)
Rnd 8: sl st in next 5 st, inc in next 5 st, sl st in next 5 st (20)
Rnd 9: sc around (20)
Rnd 10: (in back loop only) dec around (10)
Finishing: Stuff body, leg and foot completely.  Whip stitch foot closed from one side to the other.  This will make the foot longer rather than wider to match the general shape of a smurf foot.  Finish off and weave extra yarn into leg.

Leg #2 (white)
Rnd 1: connect yarn to middle front of body with loop.  Ch 1, sc 9 around
Rnd 2: sl st in st of other leg, ch 1,
Rnd 3: sc around next 11 st (11)
Rnd 4: sk 1 st, sc around (11)
Rnd 5-10: same as rnds 5-10 of Leg #1
Finishing: Stuff body, leg and foot completely.  Whip stitch foot closed from one side to the other.  This will make the foot longer rather than wider to match the general shape of a smurf foot.  Finish off and weave extra yarn into leg.

Hand (turqua)- make 2
Rnd 1: ch 8, sl st in 1st ch to make loop
Rnd 2: sc around (8)
Rnd 3: (sc in next 2 st, dc) 2 times (6)
Rnd 4-7: sc around (6)
Rnd 8: inc around (12)
Rnd 9: sl st, tr st, sl st, sc in next 9 st (12)
Rnd 10: (dec every other) 4 times (8)
Rnd 11: dec around (4)
Finishing: whip stitch fingertip end closed.  Pull yarn through hand to wrist, stopping to add a stitch which closes area between thumb and fingers.  Stuff lightly.  Use remaining yarn to attach arm to body in desired position.

Tail (turqua)
Rnd 1: 4 sc in mc (4)
Rnd 2: inc every other (6)
Rnd 3: sc around (6)
Finishing: finish off, attach to backside (It is attached just below the waistline of pants)

Adjustments:
~ Sew mouth on with black yarn
~ Take length of blue.  Hook to quilter’s needle with knot at end.  Sew one stitch through bottom of nost to just between eyes to make the nose point slightly upward.
~ Optional: sew black eyebrows.


Please leave a comment if you have any questions or if you have anything else to say!!


Friday, September 9, 2011

Free Hotpad/Potholder Instructions

The quote I chose as a description for this blog is "Yes I crochet!  Do I look like an unhip granny?!"  Yet the first post I decide to write about is the hotpad/potholder, which is the ultimate granny crochet project in my opinion.  Despite this, I love hotpads!! They come in handy all the time and they are a fun way to decorate the kitchen.  But mostly, they are a great, semi-quick project that I can mindlessly do while watching a movie.  Oh, hotpads, how well you serve me in my life!!


How to make a hotpad:  Make a chain however long you choose (This will be the diagonal length).  When you have chained to the desired length (I usually do 35 chains), chain one extra, turn and do single crochet (sc) stitches back down the entire chain.  When you reach the last chain, single crochet twice in that stitch.  In my opinion, this is where the most difficult step is... sc down the opposite side of the starting chain.  A hotpad is worked in continuous rounds, meaning you will not stop at the end, turn and go back down the previous row.  Continue stitching around and around.  Eventually the work will fold over itself.  Continue stitching until the opposite ends of the most recent row of stitches meets with itself.  When this happens (the hotpad should be more or less square) you will use a quilting needle to whip stitch the hotpad closed.  This makes the work a two-ply hotpad, which means it will be thick enough that you do not get burned while carrying hot things.  To make striped hotpads, simply switch colors after the desired stripe has been made.